workflow

...now browsing by category


(Digital) Darkroom Confessions, part II

Thursday, April 26th, 2012

In my last blog post, I talked about my opinion regarding “rules” in photography.  In short, I believe it is okay to manipulate exposure or crop (for example) in order to take an image from visualization to the final product.  In this post, I would like to revisit the image I introduced last time and dissect it a bit.

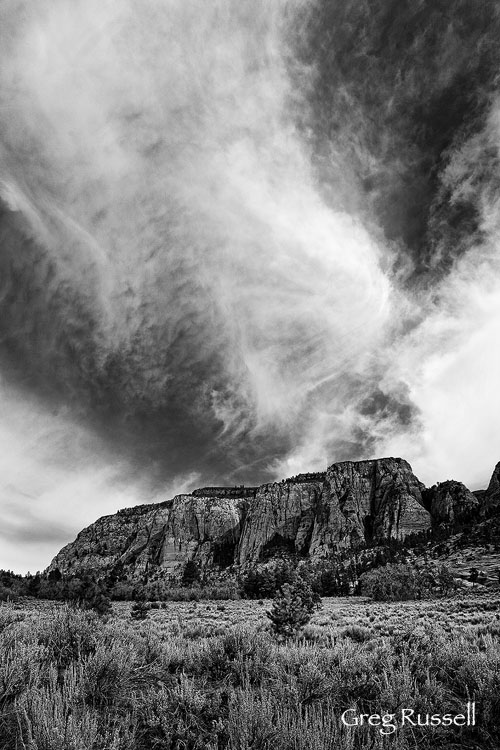
Navajo Sandstone Cliffs

Sandstone & Clouds, March 2012

In the field

I am not normally a “grand landscape” sort of photographer; I tend to focus more on intimate scenes.  However, when I saw these cliffs, what initially struck me was the fact that the buttresses were receding away from me.  Although the mid-morning light had eliminated some of the shadows, I liked that each buttress was casting a bit of a shadow on the buttress behind it.  This alternation of light and dark creates a wonderful sense of depth in images, and was a compositional element I wanted to take advantage of here.

Another confession: guys like me do not normally score skies like this.  Cloudless blue skies are the story of my life.  However, on this particular day, I was loving these high clouds; they were constantly changing and they added a great geometric element to the scene.

For me, the decision of how to balance the composition was pretty easy, and despite the fact I like to think of myself as a rebel, I roughly divided the composition into thirds. I wanted the sky to be the star of the show, so I gave it 2/3 of the frame, and I let the cliffs occupy the remainder.  I like sagebrush, and wanted to leave some foreground in as well; this also gives a good visual “root” for the cliffs to sit on.

To expose the frame, I had a couple of choices.  To underexpose would have meant preserving the shadows that attracted me to the scene.  But, it would also introduce shadows to the foreground, which I did not really want to do.  The alternative I had was to overexpose to the point where the shadows were not as dark while maintaining detail in the rest of the frame.  You have probably heard the phrase, “expose to the right;” that is what I chose to do here.  Phil Colla has a concise and clear explanation of the technique here.

You can always darken a scene in post-processing, but to lighten it up risks introducing noise.

To get the exposure I wanted for the lower part of the image, I had trouble preserving detail in the bright white clouds, so I made two exposures, 1 stop apart from each other.

At home

I opened the RAW files together, and in Adobe Camera RAW I adjusted the images based on the vision I had in the field.  After opening the images in Photoshop, I continued this process.  First I blended the images using a technique I learned several years ago from Younes Bounhar.  You can read about it here.   After checking carefully to make sure the images had aligned properly and there were no artifacts, I made my initial adjustments largely using Nik’s software plug-ins.  The two I used here were the ‘Tonal Contrast’ filter (in Color Efex Pro), and then I used Silver Efex Pro to get the black and white conversion I wanted.

I do not have a lot to offer in terms of strategic choice on this (I did what looked best to my eye), but I only made subtle adjustments and I made careful choices based on my vision.  In choosing the black and white filter, I made sure to keep  the detail in the clouds, but also to make them stand out.  I also kept an eye on the tonal contrast between the sagebrush and the beginning of the cliffs.

I applied a global curves layer, and then used separate levels to mask the cliffs, and selectively darken the shadows.  I saved the TIFF file (with all of the layers), and then flattened, sharpened, and saved a JPEG for the web.

The beauty of image processing is that there is definitely more than one way to skin the proverbial cat.  When you start with a creative vision, you learn ways to arrive at the final product in post-processing.  As you gain experience, you build skills that will eventually become a tool kit that you can selectively choose from when you process more challenging images.

(Digital) Darkroom Confessions, part I

Monday, April 23rd, 2012

When I look in the mirror, I see a man with secrets.

You see, I have broken the rules.


Not only do I consider Alister Benn a good friend, I also consider him a mentor; if I have learned anything from Alister, it is to take control of the image-making process, from visualization to capture to processing in the digital darkroom.  The more I work to embrace this philosophy, the more I realize it involves breaking the rules.  But it also requires a strong understanding of my own vision, as well as the technical capabilities of my equipment.

I have heard the argument several times that photographers should “get the composition right in the camera,” or “get the exposure right in one frame.”   To some extent, I completely agree with the opinion that one should not make a frame with the intent of cropping out an annoying foreground element, or bracket haphazardly, without much thought–these behaviors are often regarded as laziness or a display of lack of knowledge.  As an analogy, this is similar to a student choosing every possible answer on an exam because, “one of them has to be correct.”

However, the other side of the coin dictates that a strict adherence to these “rules” (and others) severely limits the artist’s creative process.  For instance, the image I visualize in the field may not fit perfectly into a 3:4 or 4:5 aspect ratio, and exposing multiple frames for stitching later may not always be practical.  Similarly, if one understands the technical limitations of their camera in exposing for a scene with a high dynamic range, it should be perfectly acceptable to bracket exposures.

In other words, when breaking the rules is in line with vision and an understanding of what the scene demands, it should be encouraged.  Be rebellious.


So, how does an image evolve?  When I was recently in Zion National Park, I was driving along the road and saw a scene that jumped out at me.  Sometimes scenes really present themselves to you.

Navajo Sandstone cliffs

Navajo Sandstone & Clouds, March 2012

It was mid-morning, and I loved the way the clouds contrasted against the cliffs, and the way the buttresses in the rock created layers.  I wanted to emphasize this in the final image, but was presented with a few choices as to how to do it.

In my next post, I will go through my thoughts in the field and a few of the processing steps that led me to the final product.

Mood and creativity in image processing

Monday, December 12th, 2011

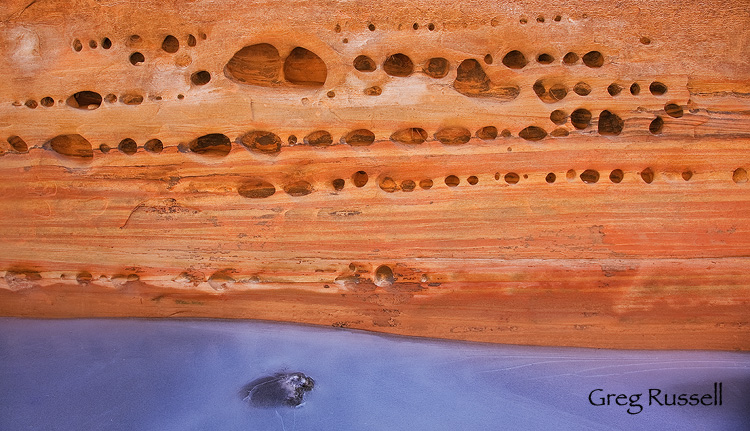
In February, I featured this image as my photo of the month; I took it in Buckskin Gulch, Utah on a cold, icy day.

Ice and sandstone in Buckskin Gulch, Utah

Original Ice Underneath, January 2011

The original scene stopped me because I liked the chilly feeling in the ice, and the way the light was reflecting off the walls of the canyon; the tafoni created an interesting pattern in the flowing rock wall.  In addition, I liked the sensuous line at the rock-ice interface.  However, mostly I liked the contrast between warm and cold tones.

While I was happy with the original edit of the image, I have recently revisited it in an effort to accentuate the feeling the original scene gave me.  With the current state of digital image processing, there are multiple ways to achieve my desired effect.  Guy Tal recently published a great article on understanding white balance; understanding that there can be more than one appropriate white balance within a scene has been immensely valuable to me as my own processing skills have developed.   Ultimately, I chose to use Nik’s Silver Efex Pro to give a slightly cooler color cast to the ice, thus conveying the contrast between warm and cool tones I originally envisioned when I was in the canyon on that cold January day.

Ice and sandstone tafoni in buckskin gulch, utah

Ice Underneath, rework, October 2011

While today’s cameras do an excellent job of capturing the “information” in a scene, there is still work to be done in bringing out the full potential in a scene during post-processing.  What are some of your favorite techniques in doing this?

Incidentally, my friend Guy Tal does have an excellent and in-depth e-book devoted to this subject; you can read more about it at this link.  Note that I’m not a member of his affiliate program, so I get nothing more than good karma if you purchase the e-book.

Dumpster Diving

Friday, February 18th, 2011

/dump’-ster di:’-ving/ -n 1. The practice of searching through dumpsters for discarded, but still usable, goods such as food or clothes.  2.  The practice of searching through one’s hard drive for RAW files that have not been processed before.

Its raining today, and I’ve got a 3-year-old in tow.  Definitely not a day that’s conducive to be outside for serious photography.  We’ve all been in this position before, when we’re dying to get out, but life just seems to get in the way.  What to do?  One thing I like to do is “dumpster dive”–go through my hard drive and revisit images that did not quite seem to make the cut before.

There are multiple reasons to dig through the rubbish of past shoots.  Perhaps your post-processing skills have improved since you captured the RAW file, or you have new inspiration of how to process the image.  Or simply, your tastes have changed, and something that didn’t appeal before is suddenly more attractive.

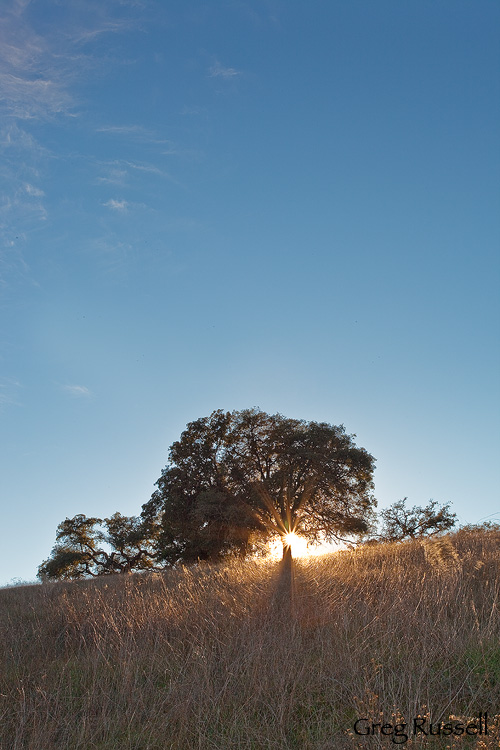
I processed this image a while ago, from a visit to the Santa Rosa Plateau Ecological Reserve in December.  I loved the scene of sun peeking out from behind this oak tree, but never could quite get the processing right.  After coming back to the image a couple of months later, I was able to shed some new light on the processing problem.  Now, its one of my favorites from this lovely wilderness area.

Do you have images that benefitted from an initial cast-off and subsequent revisiting?  Please share links in the comments section!

Oak tree and sunburst at the Santa Rosa Plateau ecological reserve near temecula california

Sunburst, December 2010